In woodworking, precision and strength are everything. One of the most reliable and widely used joints for creating sturdy structures is the Dado à. A dado is a three-sided rectangular channel or groove cut into a workpiece—usually wood—designed to hold another board securely in place.
From bookshelves to cabinets, this joint plays a crucial role in ensuring durability, alignment, and professional-quality results. In this article, we’ll explore what a dado is, its types, uses, advantages, and how to cut one effectively.
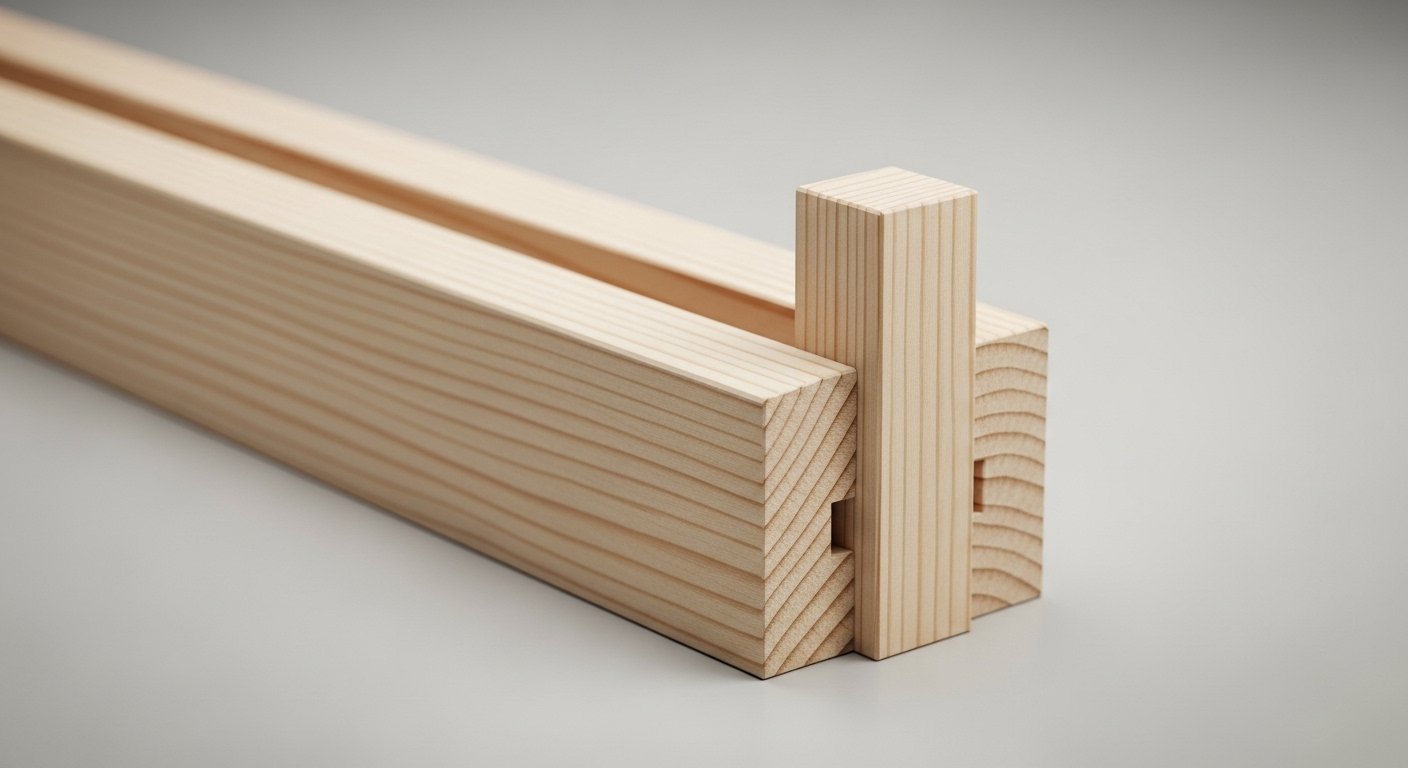
What Is a Dado Joint?
A dado joint is a slot cut across the grain of a board, forming a three-sided channel. This groove allows another board to fit snugly into it, creating a strong and stable connection.
Unlike simple butt joints, which rely heavily on nails or screws, dado joints provide mechanical support. This makes them ideal for projects that require long-lasting strength and alignment.
Key Characteristics of a Dado
- Three-sided channel cut into wood
- Typically runs perpendicular to the grain
- Designed to hold another board securely
- Often reinforced with glue, screws, or nails
These features make dados both functional and visually clean in woodworking projects.
Common Uses of Dado Joints
1. Shelving
Dado joints are widely used to support shelves in bookcases and storage units. The groove helps distribute weight evenly, preventing sagging.
2. Cabinets
In cabinet construction, dados are used to join sides, bottoms, and dividers. They provide a clean, professional finish without visible fasteners.
3. Drawers and Storage Units
Dados help align and secure internal partitions, making them perfect for drawer organizers and compartments.
4. Furniture Making
From desks to wardrobes, dado joints are commonly used where strength and precision are required.
Types of Dado Joints
1. Through Dado
This type runs completely across the board from one edge to the other. It is easy to cut and commonly used in shelving.
2. Stopped (Blind) Dado
A stopped dado does not extend all the way to the edge, making it hidden from the front. This creates a cleaner, more refined appearance.
3. Sliding Dado
Also known as a housing joint, this variation allows one board to slide into the groove during assembly.
Advantages of Using a Dado Joint
Strong and Durable
The interlocking design increases surface area for glue, resulting in a stronger bond.
Improved Alignment
The groove helps keep boards perfectly aligned during assembly.
Clean Appearance
Dados reduce the need for visible fasteners, giving projects a professional look.
Load-Bearing Capability
Ideal for shelves and cabinets that need to support heavy weight.
How to Cut a Dado Joint
Tools You Can Use
- Table saw with a dado blade set
- Router with a straight bit
- Circular saw (with guide)
- Chisel (for fine adjustments)
Basic Steps
- Measure and mark the desired location of the dado
- Set the depth (usually about one-third the thickness of the board)
- Cut the groove using your preferred tool
- Test fit the second board
- Adjust if needed for a snug fit
Accuracy is key—too tight can split the wood, while too loose weakens the joint.
Tips for Perfect Dados
- Always use sharp tools for clean cuts
- Measure twice before cutting
- Test on scrap wood first
- Use clamps during assembly for better bonding
- Apply wood glue evenly inside the groove
Conclusion
The dado joint is a fundamental technique in woodworking that combines strength, precision, and aesthetics. Whether you’re building shelves, cabinets, or custom furniture, mastering this joint can significantly improve the quality of your work.
By understanding how dados function and how to create them properly, you can take your woodworking skills to the next level and produce projects that are both durable and visually appealing.